


Live Music at Your Venue: From a Restaurant Duo to a Concert Stage
What a restaurant, bar, club or summer stage needs to host live musicians: from the input list and monitors to stage power, sound level limits and budget.
A live band places demands on a venue that background music never does. Every source on stage has to be picked up by a microphone or a DI box, the musicians need to hear themselves, and the level in the room has to stay under control even when the drummer gets carried away. If this isn't thought through in advance, the evening turns into a series of improvisations: there aren't enough inputs, the monitor squeals, the breakers trip on the first song, and the neighbors call the police by the third set. Below we look at what a restaurant, bar, club, hall or summer stage needs to host live musicians regularly and predictably. We covered overall system architecture and room calculations in our article on sound for venues of different sizes; here the focus is specifically on the stage.

Three levels of venue readiness
Before choosing equipment, decide what role the venue takes on. There are essentially three options.
| Level | What the venue provides | What the artist brings | Where it fits |
|---|---|---|---|
| Infrastructure | Stage, power, connection points, a line from the stage to the main PA | Their own console, microphones, sometimes speakers too | Occasional events, visiting cover bands with their own sound |
| Basic kit | Main PA, console, 2–4 monitor lines, vocal mics, DIs, stands, cables | Instruments, sometimes their own mics and IEMs | Restaurant or bar with a program 1–3 times a week |
| Full kit | All of the above plus a monitor console or IEM buses, drum mics, backline (drums, amps) | Instruments and "personal" microphones | Club, concert hall, summer stage with a daily program |
A basic kit can be run by a trained staff member or by the artist from a tablet; a full kit requires a sound engineer.
The input list: where the conversation with the artist starts
The input list is a table of every source on stage with its console channel number, pickup method, stand type and a phantom power flag. It is used to count the console and stage box inputs and the number of microphones, DI boxes and stands, and it lets the sound engineer build the console scene in advance. It helps to keep a single channel order for all line-ups: drums, bass, guitars, keys, horns, vocals, playback — that way the console scene changes as little as possible from night to night.
Duo: vocals, acoustic guitar, keys
| Channel | Source | Pickup | Stand | 48 V |
|---|---|---|---|---|
| 1 | Acoustic guitar, pickup | Active DI | — | yes |
| 2 | Acoustic guitar, body (optional) | Small-diaphragm condenser, cardioid | Small boom | yes |
| 3 | Keys L | Passive DI (stereo or two mono) | — | no |
| 4 | Keys R | Passive DI | — | no |
| 5 | Vocal 1 (keyboard player) | Dynamic, supercardioid | Boom | no |
| 6 | Vocal 2 (guitarist) | Dynamic, cardioid | Boom | no |
| 7–8 | Laptop playback L/R | Stereo DI with ground lift | — | no |
That makes 8 inputs and two monitor lines. In a noisy restaurant channel 2 is often switched off: the pickup gives more gain before feedback, while a mic on the body only adds naturalness in a quiet room.
Jazz quartet: piano, double bass, drums, saxophone
| Channel | Source | Pickup | Stand | 48 V |
|---|---|---|---|---|
| 1 | Kick | Kick drum dynamic, outside at the resonant head | Low boom | no |
| 2 | Snare | Dynamic, cardioid | Small boom | no |
| 3 | Overhead L | Small-diaphragm condenser | Tall boom | yes |
| 4 | Overhead R | Small-diaphragm condenser | Tall boom | yes |
| 5 | Double bass, pickup | Active DI | — | yes |
| 6 | Double bass, microphone | Condenser, cardioid, near the bridge | Small boom | yes |
| 7 | Piano, low strings | Condenser | Boom | yes |
| 8 | Piano, high strings | Condenser | Boom | yes |
| 9 | Saxophone | Dynamic or condenser, cardioid | Boom | by type |
| 10 | Announcements, vocals | Dynamic, supercardioid | Straight | no |
10 inputs, 3–4 monitor lines. If there is a digital piano instead of a grand, channels 7–8 become a stereo DI. Four microphones are enough for a jazz drummer: the overheads are the main source here.
Five-piece cover band
Line-up: drums, bass, guitar (switching to acoustic), keys, lead vocals; backing vocals from the guitarist and the keyboard player.
| Channel | Source | Pickup | 48 V |
|---|---|---|---|
| 1 | Kick | Kick drum dynamic | no |
| 2 | Snare, top | Dynamic, cardioid | no |
| 3 | Hi-hat | Small-diaphragm condenser | yes |
| 4 | Tom 1 | Dynamic, supercardioid | no |
| 5 | Floor tom | Dynamic, supercardioid | no |
| 6–7 | Overheads L/R | Small-diaphragm condensers | yes |
| 8 | Bass | DI (from the preamp output or in parallel with the cabinet) | depends on the DI |
| 9 | Electric guitar, cabinet | Dynamic, close to the speaker cone | no |
| 10 | Acoustic guitar | Active DI | yes |
| 11–12 | Keys L/R | Passive DIs | no |
| 13 | Lead vocal | Dynamic, supercardioid (or wireless system) | no |
| 14 | Backing vocal, guitarist | Dynamic, cardioid | no |
| 15 | Backing vocal, keyboard player | Dynamic, cardioid | no |
| 16 | Sound engineer's talkback | Dynamic with switch | no |
| 17–18 | Playback / break music L/R | Console line input | — |
18 channels, 16 of them microphone channels. Monitors: lead vocal, guitar, bass, keys, drums — five mono mixes to floor wedges, or four mono mixes and one stereo IEM mix for the lead singer. With a 20–25% reserve for a guest soloist, a second vocal mic and percussion, a venue hosting line-ups like this needs 20–24 mic inputs and 6–8 monitor buses.
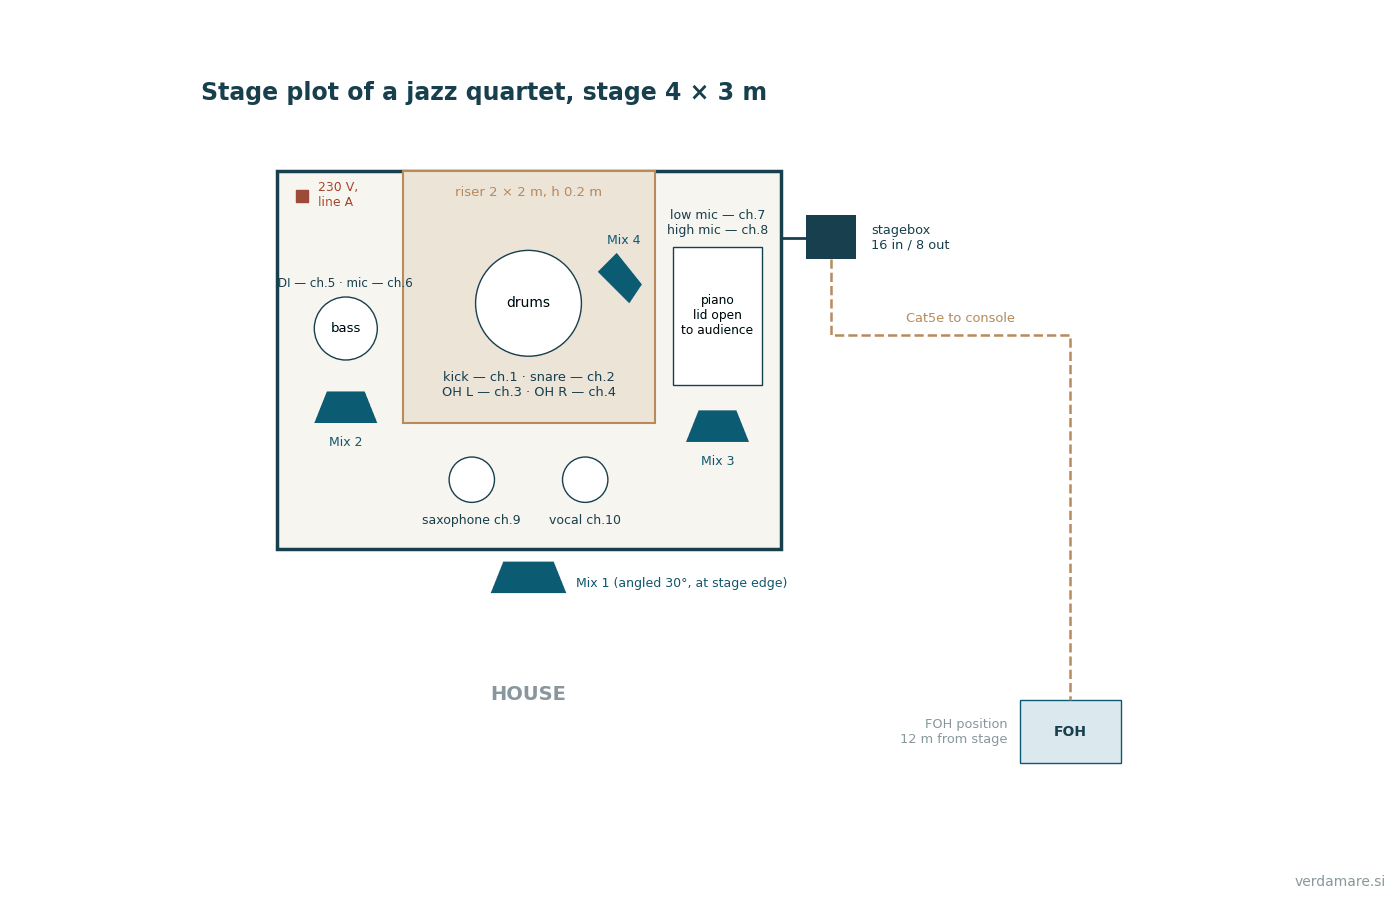
A stage plot — a top-down diagram of the stage — complements the input list: it shows where the monitors, power outlets and cables are. If they receive it the day before, the technician can set up the stands before the band arrives.
Microphones, DI boxes and phantom power
Dynamic or condenser
A dynamic microphone needs no power, handles very high levels and responds weakly to distant sources — the standard for vocals in a loud band, drums and guitar cabinets. A condenser is more sensitive and more accurate on transients and high frequencies, but it needs power (usually 48 V phantom) and picks up more of the stage: its place is on overheads, hi-hat, piano, acoustic instruments and horns in quiet line-ups. A condenser vocal mic in a club with floor wedges almost always reduces gain before feedback.
Polar pattern
Three polar patterns matter on stage. For an ideal cardioid, sensitivity at 90° is 6 dB below on-axis, and the minimum (null) points straight back, at 180°. A supercardioid attenuates about 8.6 dB at 90°, its nulls lie at about 126° off axis, and directly behind it a small rear lobe remains (about −12 dB). A hypercardioid has its nulls at 110°, about 12 dB of attenuation at 90° and a rear lobe of about −6 dB.
A supercardioid rejects sound from the sides better, but a monitor placed directly behind it falls into the rear lobe rather than into a null.
48 V phantom power
P48 phantom power is described in IEC 61938: 48 V (±4 V) is applied simultaneously to both signal conductors of a balanced line through 6.81 kΩ resistors relative to the shield, with up to 10 mA per microphone. Phantom power does no harm to a dynamic microphone on an intact balanced cable, but there are three rules:
- switch phantom on only after the cable is connected, and mute the channel: hot-plugging produces a loud click in the main PA and monitors;
- on digital consoles phantom power is tied to the physical input (the stage box socket), not to the channel — check the patch;
- unbalanced and damaged cables, XLR–jack adapters and vintage ribbon microphones are a risk zone when phantom power is on.
DI boxes
A DI box converts an instrument's unbalanced high-impedance output (guitar pickup, keys, laptop) into a balanced low-impedance mic-level signal that travels without loss or interference through the multicore to the stage box. A passive transformer DI needs no power, is reliable and suits keys and sources with a line output well. An active DI is usually phantom-powered, has a high input impedance (around 1 MΩ and above) and is needed for passive acoustic guitar and double bass pickups, which lose high frequencies under a low load. The ground lift switch breaks the signal ground between the instrument and the line and cures ground loop hum. The protective earth conductor of the mains plug is never disconnected in the process — more on this in the section on power.
Wireless systems: licensed bands only
A wireless mic or headset is needed by a vocalist who dances, a host or an MC. The Verdamare catalog includes in its Microphones section the LD Systems U518 BPH — a system with a bodypack transmitter and a headset microphone: True Diversity receiver, 1785–1800 MHz band, selectable transmitter power up to 30 mW, automatic frequency scan and IR sync, up to four systems simultaneously, powered by two AA batteries for up to 10 hours. The 1785–1805 MHz band is harmonized in the EU for wireless audio systems by Commission Implementing Decision 2014/641/EU; nevertheless, the suitability of the frequencies for a specific country and venue is confirmed before ordering.
Check older systems: the 790–862 MHz band has been reassigned to mobile communications, and only the 823–832 MHz duplex gap remains for wireless microphones there. The other UHF bands are used under the conditions of the national regulator (in Slovenia, AKOS), and specific frequencies are chosen by scanning the spectrum on site.
The console: inputs, buses, matrices, recording and control
A console is chosen by five parameters: the number of mic preamps, the number of output buses for monitors, matrices for zoning, built-in recording and the control method. The number of "channels" in a model name is often larger than the number of physical mic inputs: the rest are line inputs, effects returns or channels connected via a digital stage box.
| Model | Inputs (per catalog listing) | Outputs and buses | Recording / interface | Control and network |
|---|---|---|---|---|
| Behringer Flow 8 | 8 DSP channels, 4 mic | 2 × XLR, 2 × 6.3 mm; 2 effects processors | USB 10 × 2, 48 kHz | Bluetooth, FLOW app |
| Allen & Heath CQ-12T | 12 inputs: 5 × XLR, 5 × XLR/TRS, stereo TRS | Main + 6 monitor outputs | USB 16 × 16, SD | 7″ touchscreen |
| Allen & Heath CQ-18T | 16 mic/line + stereo line | 2 main + 6 monitor; 4 effects processors | USB 24 × 22, multitrack recording to SD | Wi-Fi 2.4/5 GHz, Bluetooth |
| Allen & Heath CQ-20B | 16 mic/line + 2 stereo | 8 outputs | USB 24 × 24; SD 24 × 24 (48 kHz) | No screen, Wi-Fi, CQ-MixPad |
| Behringer XR18 | 16 Midas preamps + 2 line | Main L/R + 6 aux; 4 effects processors, RTA | USB 18 × 18 | Wi-Fi, Ethernet, tablet, PC |
| Yamaha DM3 | 16 mic/line | 8 × XLR; 6 buses, 2 effects buses, 2 matrices | USB 18 × 18 | Dante 16 × 16, 96 kHz |
| Behringer X32 Compact | 32 channels, 16 × XLR | 8 × XLR, 16 buses, 6 matrices, 8 effects | USB 32 × 32 | AES50 |
| Allen & Heath Qu-5 | 38 inputs / 24 outputs; 16 mic/line + 2 stereo | 17 motorized faders | USB | SLink, 96 kHz |
| Allen & Heath SQ Rack | 48 channels, 17 × XLR | 12 × XLR; 12 stereo mixes, 3 matrices, 8 stereo effects | USB 32 × 32, SQ-Drive | SLink 128 × 128, 64 × 64 expansion port |
| Behringer WING Rack | 48 channels, 24 Midas PRO preamps | 8 outputs; 16 stereo aux, 8 stereo matrices, 16 stereo effects | USB 48 channels, 2 × SD up to 64 tracks | 3 × AES50, 10.1″ screen |
How to read the table against our input lists:
- The duo fits on a CQ-12T: 10 inputs plus stereo, six monitor outputs. A Flow 8 with four mic inputs will suit a solo artist or a duo whose keys and playback go into the line inputs of a console placed nearby.
- The quartet — CQ-18T, CQ-20B, XR18 or DM3: 16 mic inputs and six monitor outputs cover it with room to spare. The XR18 and CQ-20B have no control surface of their own and sit right on stage, while the sound engineer works from a tablet in the room.
- The five-piece cover band, with its 16 mic channels, hits the limit of 16-preamp consoles. For headroom you need 20–24 inputs: a WING Rack (24 preamps) or an X32 Compact, SQ Rack or Qu-5 with additional inputs via a digital stage box over AES50 or SLink.
Aux buses determine the number of independent monitor mixes. A stereo IEM mix takes two mono buses or one stereo bus. The X32 Compact has 16 buses — enough for six floor wedges, two stereo IEM mixes and effects buses.
Matrices send one mix to different zones at different levels and delays: front fills, foyer, terrace, recording.
Effects. The working minimum is one reverb for vocals, a second for drums, and a delay; the four processors of the CQ and XR18 are enough for this.
Recording. Multitrack recording of every input lets you tune the sound to your own system the next day without the musicians (a "virtual soundcheck"): the recorded tracks are fed back into the console channels. This requires a bidirectional USB interface or card recording with playback.
Remote control over Wi-Fi — only through the console's own dedicated access point, never through the venue's guest network.
Monitoring: musicians must hear themselves
Musicians who can't hear themselves play louder, the guitarist turns up the cabinet, and in a small room the stage becomes louder than the main PA. A monitor system is a prerequisite for level control, not an add-on.
Floor wedges

The catalog has two passive Electro-Voice floor wedges. The TX1122FM has a 12″ woofer and an HF driver, a frequency range of 55 Hz – 20 kHz at −10 dB (70 Hz – 20 kHz at −3 dB), a maximum level of 132 dB, 500 W continuous power, 8 Ω, 90° × 50° coverage and a weight of 19.8 kg. The TX1152FM is a 15″ model, 45 Hz – 20 kHz, up to 133 dB; it is the choice for the drummer and the bass player, who need low end. A passive monitor needs an external amplifier; by common practice, the continuous power of the amplifier channel into 8 Ω is chosen at 1.5–2 times the loudspeaker's rated continuous power, and the level is limited by a limiter on the bus.
With 90° coverage, at a distance of 1.5 m the horizontal footprint is about 3 m: one wedge is enough for a musician, two for a lead vocalist who moves around. The wedge is aimed at the ears and placed in the null of the microphone's polar pattern.
Placing the monitor against the microphone's polar pattern
For a cardioid microphone the wedge goes directly in front of the performer, that is, behind the microphone, at 180° to its axis. With a supercardioid the same wedge would sit in the rear lobe, so it is better to spread two wedges to the sides so that, from the microphone's point of view, they are at about 125° to its axis. For a hypercardioid the angle is smaller still — about 110°. If the vocalist holds the microphone at a tilt, the axis turns with the hand, and this must be taken into account when placing the wedges.

Two more rules: don't add every instrument to the vocalist's mix — the louder the mix as a whole, the less headroom there is for the voice; and every monitor bus needs its own parametric EQ.
In-ear monitors (IEM)
IEMs make the stage quieter and the room cleaner, and give the musician consistent sound anywhere on stage. In a restaurant with a quiet program they are often better than floor wedges; in a band, at least for the lead vocal. For the drummer and the keyboard player a wired IEM is enough: it is cheaper and takes up no spectrum.
Wireless IEMs follow the same rules as wireless microphones: only bands permitted in the EU and in Slovenia, taking into account the national conditions set by AKOS, with frequencies chosen by scanning on site. IEM transmitters and wireless mic receivers in the same band are planned together; otherwise intermodulation products from the transmitters land on the microphone frequencies. IEM transmitter antennas are not placed right next to receiver antennas.
IEM volume is brought up from the minimum, and a limiter is put on every IEM bus: without one, feedback or a dropped cable hits straight into the ears.
Gain staging and fighting feedback
Levels along the chain
Gain staging means setting gain so that the signal is everywhere above the noise and below clipping. On a digital console:
- Channel fader and master at 0 dB (nominal position), EQ and dynamics off.
- The musician plays at full concert intensity, not "just for a check". The preamp gain is set so that the average level is around −18 dBFS and peaks don't exceed −6 dBFS.
- If a loud source is still too hot at minimum gain, engage the pad on the microphone or DI rather than pulling down the fader.
- The high-pass filter (HPF) is engaged on all channels except kick and bass: 80–120 Hz on vocals, 100–150 Hz and above on overheads, 80–100 Hz on acoustic guitar.
- The level in the room is controlled with the faders and the master, and system limiting is done by a limiter in the processor or in the active loudspeakers themselves, set once and locked against changes.
Gain before feedback: calculate, don't guess
Potential acoustic gain (PAG) in a free field is estimated with the classic formula:
PAG = 20·lg(D0) − 20·lg(Ds) + 20·lg(D1) − 20·lg(D2) − 10·lg(NOM) − 6 dB,
where D0 is the distance from the performer to the farthest listener, Ds from the mouth to the microphone, D1 from the microphone to the nearest loudspeaker, D2 from that loudspeaker to the farthest listener, NOM is the number of open microphones, and 6 dB is the stability margin. The needed acoustic gain (NAG) equals 20·lg(D0/EAD), where EAD is the distance at which the listener would like to hear the performer without amplification.
A restaurant example: D0 = 10 m, Ds = 5 cm, D1 = 4 m, D2 = 8 m, four open microphones. PAG = 20 + 26.0 + 12.0 − 18.1 − 6.0 − 6 ≈ 28 dB. If a guest at the back of the room should hear the singer as if she were standing 2 m away, NAG = 20·lg(10/2) ≈ 14 dB, so there is headroom. Now the singer holds the microphone 15 cm from her lips: PAG drops to 18.4 dB and the margin shrinks from 14 to 4 dB — right on the edge. Four more open microphones (NOM = 8) take away another 3 dB. Hence the practical conclusions:
- the cheapest way to gain headroom is to teach the vocalist to sing close to the microphone: every doubling of Ds costs 6 dB;
- mute channels that aren't in use at the moment (mute groups, DCAs);
- the main PA should stand in front of the microphone line and not "see" the stage;
- the formula ignores directivity and reflections; in a real room the margin is usually smaller than calculated.
Ringing out the system
- Set the main PA and monitors in their show positions and the microphones in their working positions.
- Slowly raise the level of the monitor mix with the vocal microphone until the first sustained "ring" appears.
- Find the frequency on the analyzer (RTA is available on the XR18 and most digital consoles) and set a narrow notch with the parametric EQ: Q of 5–10, depth of 3–6 dB.
- Keep raising the level up to the next frequency. A wedge usually takes three to five notches; if you need more than eight, the problem is not the EQ but the placement or the choice of microphone.
- Come back 3–6 dB below the threshold of the last feedback — that is your working level with headroom.
A main PA for the room
Detailed coverage calculations and system architectures for different scales are in our article on sound for venues of different sizes. Here, briefly, which pairs of speakers and subwoofers from the catalog suit three typical live music venues.
| Venue | Main PA | Subwoofers | Key data (per catalog listings) |
|---|---|---|---|
| Restaurant, 60–120 guests, acoustic acts and duos | 2 × Electro-Voice EVOLVE 30M, 1,299 € each | Built-in bass section | 51 Hz – 20 kHz (−3 dB), up to 123 dB, 1,000 W, 120° × 40° coverage |
| Restaurant, alternative | 2 × RCF ART 910-A, 643.50 € each | 1 × Electro-Voice ELX200-12SP, 789 € | Subwoofer: 12″, 49–135 Hz (−3 dB), up to 129 dB, 1,200 W, low-pass filter 80/100/120/150 Hz |
| Club, 200–300 guests | 2 × EV EKX-15P, 976.80 € each | 2 × Electro-Voice EKX-18SP, 1,289 € each | Top: up to 134 dB, 1,500 W; sub: 18″, 40–150 Hz (−3 dB), up to 134 dB (peak), 1,300 W, 32.8 kg |
| Summer stage, 300–600 guests | 4 × EV EKX-15P | 4 × Electro-Voice ETX-18SP, 1,799 € each | Sub: 18″, 33–150 Hz (−3 dB), 28–180 Hz (−10 dB), up to 135 dB (peak), 1,800 W, 51.8 kg |

The advantage of a column system in a restaurant is that its 120° coverage spans a wide, shallow room, while the 40° vertical dispersion puts less energy on the ceiling and the stage — which adds to gain before feedback. A maximum level of 123 dB at 1 m gives about 105 dB peak at 8 m, which is more than enough for a 75–85 dB(A) acoustic set.
For a club, a pair of 15-inch active loudspeakers with two 18-inch subwoofers is the standard configuration. Two subwoofers placed side by side add coherently in the band where the distance between them is less than half a wavelength (at 60 Hz the wavelength is about 5.7 m) and give up to +6 dB on axis compared with one, so they are not split into the corners of the room. Crossover: a 100 Hz low-pass filter on the subwoofers and a matching high-pass filter on the tops; the phase alignment is checked by measurement at the mix position.
Outdoors there are no walls to help with the low end, so you need more subwoofers than in a club of the same size; pairs of tops on each side are splayed to widen coverage. If the audience is more than 25 m from the stage, you need delay positions or a larger-class system.
The stage: dimensions, risers and the stage plot
The minimum stage area grows faster than the line-up: a drum kit with monitors and stands takes up about 2.5 × 2.5 m, and each musician with an instrument and a monitor needs another 1.5–2 m².
| Line-up | Stage, guideline | Comment |
|---|---|---|
| Solo, duo | 3 × 2 m | No drums; a riser is optional, but lighting is needed |
| Trio, quartet | 4 × 3 m | With a grand piano — 5 × 3.5 m |
| Five-piece band | 6 × 4 m | Drum riser 2 × 2 m, 20–40 cm high |
| Summer stage | from 8 × 6 m | With a roof and side "wings" for the main PA and backline |
Stage height. In a restaurant or a small club, 30–60 cm is enough for seated guests to see the performers. With a standing audience of more than 200 people, the stage is raised to 80–100 cm and must be separated from the audience area. Steps with handrails and contrasting edge marking are mandatory.
Risers. 2 × 1 m stage modules with adjustable legs let you build a stage for any line-up and store it in a back room. Load: the guideline is 5 kN/m² (about 500 kg/m²), as for areas where crowds gather. A carpeted drum riser reduces vibration transmitted to the floor and helps the drummer see the band.
The stage plot in the venue's documents. Draw your stage to scale with the power outlets, stage box connection points, monitor lines and fixed obstacles (columns, doors, windows). This sheet goes to every artist together with the rider.
Stage power
Circuits and power. A standard single-phase 230 V/16 A circuit theoretically delivers 230 × 16 = 3,680 W; for continuous loads keep a margin and don't count on more than 80%, about 2.9 kW. This is enough for a small kit (console, two active loudspeakers, a subwoofer, monitors), provided the circuit is dedicated to sound only. A club and a summer stage need a three-phase supply: a red CEE 400 V/16 A socket (3P+N+PE) gives three 16 A circuits, up to 11 kW in total; 32 A gives up to 22 kW. Blue single-phase CEE 230 V/16 A and 32 A connectors are convenient for a separate sound feed on an outdoor stage. Take the actual consumption of active loudspeakers from the manufacturer's manual (usually given as current at 1/8 power), not from the advertised "peak power".
Load distribution. Sound is fed from a separate distribution board or a separate group, from a single point, in a star: console, stage box, main PA and monitors on their own circuits, all on the same protective earth conductor. Lighting (especially dimmers), the kitchen, refrigerators, air conditioners and coffee machines go on other circuits and, if three phases are available, on other phases.
RCDs. Socket circuits are protected by 30 mA RCDs. Leakage currents from switch-mode power supplies add up and cause nuisance tripping on a large stage; the rule of thumb is no more than one third of the RCD's rated residual current as standing leakage per group, so sound is spread over several groups.
Earthing. The protective earth conductor (PE) is never disconnected — neither by a "broken off" plug contact nor by an adapter. Ground loop hum is cured by lifting the signal ground on the DI (ground lift), balanced lines and powering all the sound from a single point.
Power-up sequence. Switch on from the source towards the loudspeakers: first the console and stage box, then the processors, then the amplifiers and active loudspeakers. Switch off in reverse order. If several active subwoofers share one circuit, switch them on with a pause: the inrush currents of their power supplies add up and can trip the breaker.
Signal routing: from the stage to the console
A single twisted-pair cable carrying a digital protocol replaces a heavy 24-pair analog multicore.
AES50 is a standardized protocol (AES50-2011) used by Behringer and Midas consoles: up to 48 channels in each direction at 48 kHz over a single shielded Cat5e cable up to 100 m long. In the catalog, the X32 Compact has AES50, and the WING Rack and WING have three AES50 ports. The stage cable is shielded, with etherCON connectors.
Dante runs over a standard Ethernet IP network: the signal passes through a switch, channels are routed in software, and network latency can be set from fractions of a millisecond to several milliseconds. In the catalog, the Yamaha DM3 has Dante 16 × 16, and the WING has an expansion slot for Dante, MADI or SoundGrid. Rules for Dante: a managed gigabit switch, a VLAN or physical network separate from the guest network, Cat5e or Cat6 cable, no more than 100 m per segment.
SLink from Allen & Heath (128 × 128 on the SQ5+ and SQ Rack, also on the Qu-5) is used to connect the manufacturer's own stage boxes.

Permanent infrastructure. During renovation, lay two cable ducts from the stage to the mix position (main and backup), panels with XLR and etherCON on both sides of the stage, and a separate power feed to the console. Signal cables and DMX are run separately from power cables and cross them at right angles.
The mix position. The console should be in the room, on the center axis, at roughly two thirds of the room's depth — not in a back room and not against a wall.
Loudness, the hearing of audience and staff, and the neighbors
Level guidelines. An acoustic duo in a restaurant — 75–85 dB(A) at the guests' seats, a jazz quartet — 85–92 dB(A), a cover band club gig — 95–99 dB(A).
The audience. As a professional guideline for protecting the audience's hearing, we use the German standard DIN 15905-5 (2007 edition). It limits the rating level — the equivalent sound level LAeq averaged over any 30 minutes — to 99 dB(A), and the peak level LCpeak to 135 dB(C). Both values refer to the loudest point accessible to the audience; if measurement is taken at the mix position, a correction determined in advance for that point is applied. The standard also requires the levels to be documented during the event.
Staff. Bartenders and waiters spend their entire shift in the room, and the rules for protecting workers from noise under Directive 2003/10/EC apply to them: the lower exposure action value is LEX,8h = 80 dB(A) and LCpeak = 135 dB(C), the upper exposure action value is 85 dB(A) and 137 dB(C), and the exposure limit value is 87 dB(A) and 140 dB(C), taking hearing protection into account. Example: a waiter works 5 hours at 88 dB(A) and 3 hours at 70 dB(A). LEX,8h = 10·lg[(5·10^8.8 + 3·10^7)/8] ≈ 86 dB(A), above the upper action value. The solution is not to aim the main PA at the bar, to rotate shifts and to provide hearing protection.
Measurement and the limiter. The mix position needs a sound level meter or a measurement microphone with software that shows LAeq over a rolling 30 minutes and LCpeak. The limiter in the system processor or in the active loudspeakers is set based on the calibration results: at the system's full volume, the level in the room must not exceed the agreed limit. The password to the limiter settings is held by the venue's technical manager, not by a visiting sound engineer.
Neighbors. For residential areas, environmental noise regulations become decisive, especially for the night period. The main problem is low frequencies: they pass through structures and windows much more easily than the midrange. What helps:
- the main PA and subwoofers are aimed away from windows and shared walls, and the subwoofers don't stand right against a shared wall or touch it;
- a cardioid subwoofer arrangement (one or more units turned backwards, with delay and polarity inversion in the processor) reduces rearward radiation in the operating band by 15 dB or more at the cost of some forward level;
- a separate limiter on the subwoofer bus with a stricter threshold after 22:00;
- check measurements at the nearest windows during the first concert, and a level log.
Soundcheck step by step and the evening's timing
For a five-piece cover band at a prepared venue, the soundcheck takes 60–90 minutes.
- Line check (15 minutes, without the musicians). The technician goes through the input list: every channel responds, phantom power is on where needed, the monitors play on their buses, talkback works.
- Drums (15 minutes). Each drum separately, then the whole kit. Gain and HPF are set at this stage.
- Bass, guitars, keys (10–15 minutes). Each instrument, then together with the drums.
- Vocals (10 minutes). Each voice separately, then with the band. Checking the distance to the microphone — this is where gain before feedback is determined.
- Monitors (15–20 minutes). Each musician says what they are missing; the sound engineer builds the mixes and checks the headroom on each bus.
- A full song (5–10 minutes). Preferably the loudest in the set: this is where the limiter and the level in the room are checked.
- Saving the scene. The console scene is saved under the artist's name and the date — for a repeat performance, the soundcheck is cut in half.
Typical evening timing for a restaurant with a program starting at 20:00:
| Time | What happens |
|---|---|
| 16:30 | Load-in, setting up backline according to the stage plot |
| 17:00–17:15 | Line check |
| 17:15–18:30 | Soundcheck |
| 20:00–20:50 | First set |
| 20:50–21:10 | Break, background music at a reduced level |
| 21:10–22:00 | Second set |
| 22:00 | End of the loud program; night-mode limiter |
| 22:30 | Teardown, load-out through the service entrance |
The soundcheck is finished at least 30 minutes before the doors open.
The venue's technical rider
The venue rider tells a touring act what to expect and resolves most questions before they arrive. A working structure:
- General information. Address, load-in (gate, lift, route to the stage), contact details of the technical manager.
- Stage. Dimensions, height, surface, a stage plot to scale, risers and their sizes, connection points.
- Power. Number and type of circuits (for example, 3 × 230 V/16 A Schuko on stage, CEE 400 V/32 A for backline or lighting), location of the outlets on the stage plot.
- Main PA. Loudspeaker and subwoofer models, their number and placement, processor, the limiter in place.
- Console. Model, number of mic inputs and outputs, stage box, protocol, availability of a tablet, multitrack recording capability.
- Monitors. Number of floor wedges and monitor lines, IEMs (if any) and available frequency bands.
- Microphones, DIs and stands. A list by type and quantity.
- Backline. Drums, amplifiers, keys, if available.
- Restrictions. Maximum level (for example, LAeq,30min ≤ 99 dB(A) at the audience position, lower after 22:00), program end time, rules on pyrotechnics, smoke and open flames.
- Schedule of the day. Load-in, soundcheck, sets, teardown; which technical staff are on site.
The rider is updated every time equipment is replaced.
Licenses: SAZAS and IPF
Live performance of music at a venue is a public performance of works, which in Slovenia requires a license from SAZAS, the collective management organization for copyright. If recorded music plays between sets, the related rights of performers and phonogram producers, administered by IPF, are added. It is worth clarifying the terms and tariffs before the first concert.
Budgets for three setups at catalog prices
The prices below are taken from the Verdamare website and include VAT. Only items with a price listed on the website are included in the calculation. Consoles, stage monitors, wireless systems, microphones, DIs and cabling are offered in the catalog on request — their cost is fixed in a quotation based on a specific input list.

Restaurant: acoustic duos and trios
| Item | Qty | Price, € | Total, € |
|---|---|---|---|
| Electro-Voice EVOLVE 30M | 2 | 1,299.00 | 2,598.00 |
| Total for priced items | 2,598.00 |
Alternative: 2 × RCF ART 910-A (643.50 €) and an Electro-Voice ELX200-12SP subwoofer (789 €) — 2,076.00 €. On request: an Allen & Heath CQ-12T or CQ-18T console, two vocal microphones, two to four DIs, two floor wedges or wired IEMs.
Club for 200–300 guests: cover bands and jazz
| Item | Qty | Price, € | Total, € |
|---|---|---|---|
| EV EKX-15P | 2 | 976.80 | 1,953.60 |
| Electro-Voice EKX-18SP | 2 | 1,289.00 | 2,578.00 |
| Total for priced items | 4,531.60 |
On request: a console with 20–24 inputs (Behringer WING Rack or X32 Compact with an AES50 stage box), five to six Electro-Voice TX1122FM/TX1152FM wedges with amplifiers, a set of vocal, drum and instrument microphones, six DIs, an LD Systems U518 BPH wireless system for the host.
Summer stage for 300–600 guests
| Item | Qty | Price, € | Total, € |
|---|---|---|---|
| EV EKX-15P | 4 | 976.80 | 3,907.20 |
| Electro-Voice ETX-18SP | 4 | 1,799.00 | 7,196.00 |
| Total for priced items | 11,103.20 |
On request: an Allen & Heath SQ5+ or Behringer WING class console, a stage box, six to eight monitor lines, IEMs for the vocalists in a permitted band, a three-phase distribution board and weatherproof cabling.
Where to start
Send us your floor plan, the typical line-ups you plan to host and your opening hours. Based on these, we will draw up input lists, select a console, monitors and a main PA from the Sound Equipment section, check the stage power and prepare the venue's technical rider. After installation, we tune the system and calibrate the limiter in the room, and train your staff.
Latest articles
 Table Setting for Hotel Breakfast: Guest Place, Service and Table ResettingThe guest table at hotel breakfast: what is set in advance, what the server brings, how to reset a table quickly and how many pieces you need for a room…Read more →
 Pu-erh in hospitality: sheng and shu, brewing, cost per cup and working with the Alveus rangeWe follow pu-erh from Yunnan raw leaf to the cup in a hotel room: sheng and shu production, two brewing methods, rinsing, teaware and the exact cost per serving based…Read more →
 Porcel Porcelain for Restaurants and Hotels: How It Is Made, Why It Lasts and How to Choose a SeriesHow Porcel hard-paste porcelain is produced, what the collection ratings mean and how to put together a set for a restaurant or banquet hall from the HoReCa Collections catalogue.Read more →